Yesterday I invited two of my friends, Lynn and Leanna, and their 8 children over to decorate homemade gingerbread houses. Julie mixed up 4 batches of gingerbread over the weekend. I rolled out, cut and baked sides, ends, and roofs (6 pieces for each house) for 12 gingerbread houses Sunday afternoon, Sunday night, and also on Monday. As usual with my projects, it took way longer than I anticipated! But, I learned during the process, and next year it will be easier.
I bought one pre made gingerbread house to use as a pattern. I intended to break the house apart and use the pieces for my pattern, but I could not get the house apart! So I laid the house on notebook paper and roughly traced each part. Since I am not a perfectionist, the finished houses were less than perfect! There were gaps everywhere when we glued them together with icing. Next year I am going to ask Jimmy to help me create a better pattern.
Julie and I made royal icing using meringue powder, powdered sugar, and water and the recipe on the meringue powder can. I think we made 4 batches of icing, but we did have some left over. I made labels for each child and taped them on with clear packing tape onto icing bottles (bought in packs of two from Walmart). After much, much mess and trial and error, we discovered that the best way to get the icing from the mixing bowl into the bottles was to pour the icing into a gallon sized zip lock bag, snip one corner off, and squeeze the icing into the bottles.
I bought several different types of candies for decorating--M&Ms, sour sweet tart balls, red and green gumdrops, chewy rectangle things, twizzlers, and small gingerbread cookies. I put each candy in a bowl or on a platter, and provided each child with a rectangle plastic tray (bought at Walmart) and clear plastic cups. They filled their cups with their candies and used the trays to transport the candy to their work area. Clay and I had glued each house together just before our guests arrived, and we glued each house down on a square cake decorating board (bought at Hobby Lobby in packs of 6).
Each child has his own bottle of "glue"--edible royal icing
This stuff really is like glue! Not one house fell apart!
The gingerbread house decorating supplies
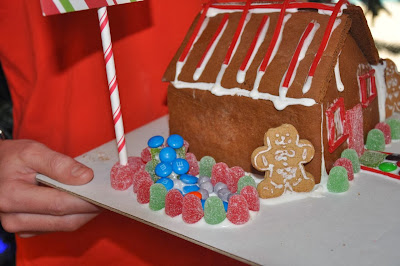
Cute little gingerbread boys
The house pieces, before we glued them together
A glued house, ready to be embellished
The children were so creative with their decorating, and I think they worked on the houses for about 45 minutes. I was so happy that none of the houses fell apart. That royal icing is strong when it dries!
Leah and Lana Kate
Avery and Annelise
Clay and Parker
These older boys had so much fun doing this!
Carson
Leah again, busily working
Julie
Jared and Sam
Jack, Leanna, and Joey
What a pretty house!
When each child finished decorating their house, I took a picture of them holding their house in front of our Christmas tree. I made little signs with their names on them. I printed the names on labels, stuck them on scrapbook paper, taped them to a cute striped lollipop stick (bought in a package from Walmart), and stuck it into a red or green candy fruit slice.
The children were so creative!
Here is the whole group (with Jack on the far left in the windowsill--he did not want to have his picture made) with their gingerbread neighborhood.
When the decorating was complete, we sent the children upstairs and outside while we cleaned up and set out lunch. Lynn and Leanna graciously brought lunch for us all--chicken strips, fruit salad, green salad, and croissants. Delicious!! We all enjoyed lunch and visiting and then the kids played some more.
It was a delightful day!


Absolutely wonderful!! No matter what you face, you always tackle it with such awesome organization!! I love it!
ReplyDeleteAnd hearing how you put this all together, makes me believe that I can too! (Though not this year!)
Merry Christmas to your family!